Photoshop Blend Modes | Function and Shortcuts
What are the blending modes in Photoshop?

In this article, I will provide a comprehensive explanation of how Photoshop Blend Modes (also known as Blend Modes) function in Photoshop. You’ve probably dabbled with Blending Modes before, and it was likely more of a trial-and-error kind of thing. This tutorial walks you through how each Blend Mode works, so you won’t have to do as much experimenting on your own.
When you have finished this Photoshop tutorial, you should have a good understanding of how Blending Modes function and which one to apply to achieve the effect you want.
Table of contents
- Functions of Blending Modes
- How Can I Modify Photoshop’s Blending Mode?
- How many different blending modes are there?
- Fill With Blending Modes vs. Opacity the Eight Unique Blending Modes
- Explanation of Photoshop Blend Modes and Their Shortcuts
- Frequently Used Blend Modes
- Photoshop Blend Modes Shortcuts
- Sources
Functions of Blending Modes
Mathematical formulas determine how Photoshop blending modes combine layers according to their color, saturation, brightness, or a mix of these factors. Without using layer masks, you can apply overlays, textures, or target modifications to particular regions of your image with Blend Modes.
There is an algorithm for each of the Blending Modes that uses color information to decide how the pixels will mix: luminosity, saturation, hue, or a mix of these. If you simplify the procedure as a whole, your understanding of Photoshop Blending Modes can become much simpler. When Blend Modes are used, an equation is applied to the input, which is the first image, to determine what is displayed on the screen.
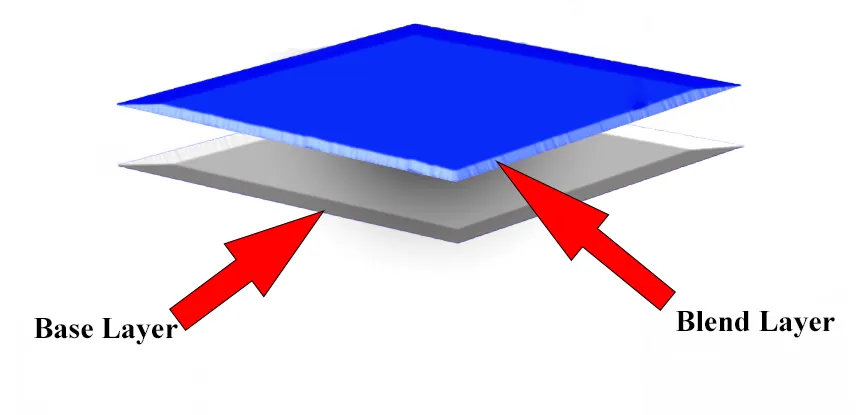
Blend Modes require a minimum of two layers to function. The layer beneath is the Base layer, while the layer above is the Blend layer. The Blending Mode specifies the mix operation utilized on the above layer. In the context of Blending Modes, Photoshop integrates the pixels by executing a blend operation on each pixel of the Blend layer in relation to its matching pixel in the Base layer. If you would like to read more articles about photo editing, you can look at Photo Editing by Photoshop.



To achieve the desired blend, it is applied to individual pixels one by one. To help you get a better idea of what’s going on, I’ll talk about pixels in terms of colors to make things easier to understand.
How Can I Modify Photoshop’s Blending Mode?
The Layer Blending Mode can be changed by selecting a different blending mode for the active layer from the unlabeled dropdown in the upper-left corner of the Layers panel. Groups are set to Pass Through by default, and all Layers are set to Normal. Shortcuts can also be used to switch between Blending Modes.
How many different blending modes are there?
Photoshop currently offers 27 Layer Blending Modes. Additionally, there are a total of 31 Blending Modes when you take into account Behind and Clear, which are two additional Blending Modes that are included in the painting tools; Pass Through, which is the default Blending Mode for Groups; and Add, which is an additional Blending Mode that is included in the Calculations and Apply Image command.
Fill With Blending Modes vs. Opacity the Eight Unique Blending Modes
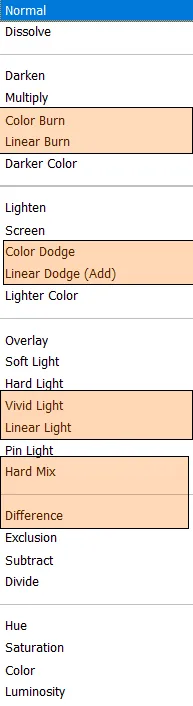
Nineteen of the twenty-seven Photoshop Blending Modes exhibit the same behavior when adjusting Fill in comparison to Opacity. Nevertheless, eight Blending Modes yield varying outcomes.
Comprehending the distinctions among blends is essential, as this supplementary approach enhances the functionalities of Blending Modes. The use of these eight Blending Modes results in a more aesthetically pleasing blend when employing Fill instead of Opacity.
The following example illustrates the blending of a graphic with varying luminance values and a photograph utilizing the Hard Mix Blending Mode. The central image has an opacity of 50%, whereas the image on the right is configured to fill at 50%.
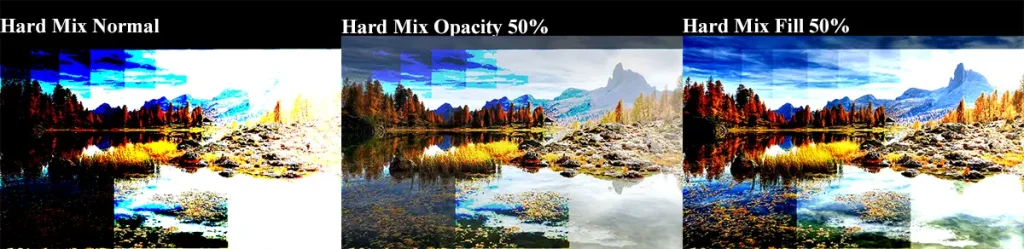
These eight Blending Modes are included in this exclusive club, and they are as follows:
- Color Burn
- Linear Burn
- Color Dodge
- Linear Dodge (Add)
- Vivid Light
- Linear Light
- Hard Mix
- Difference
Explanation of Photoshop Blend Modes and Their Shortcuts
The next examples will provide an explanation of each of the six categories of Blend Modes, which are as follows: Normal, Darken, Lighten, Contrast, Inversion, and Component. Additionally, we will discuss all of the Blend Modes that fall under each category.
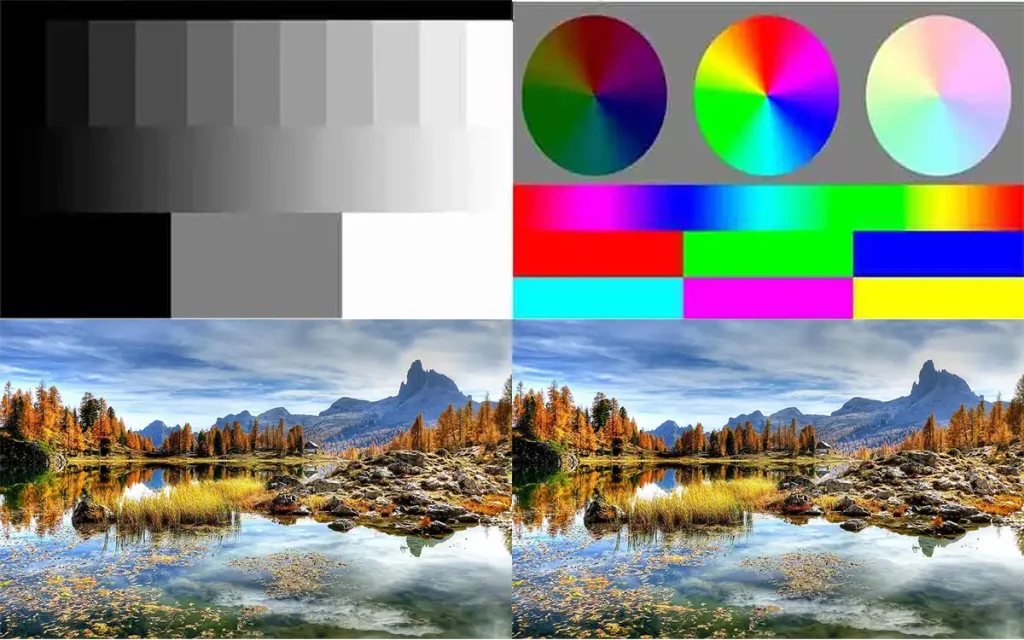
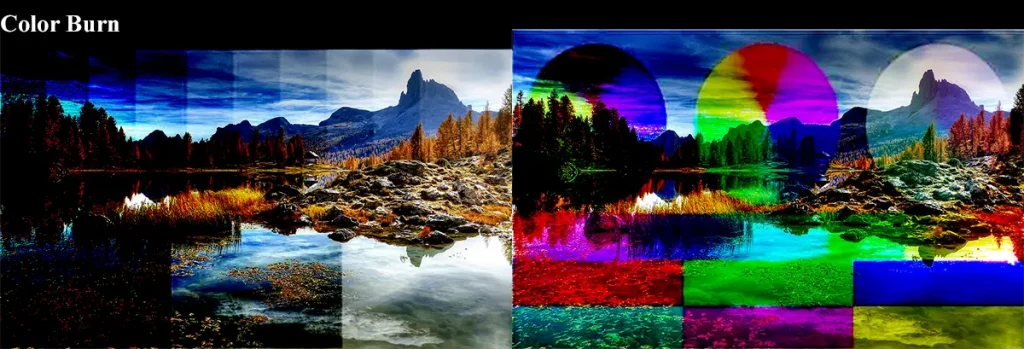
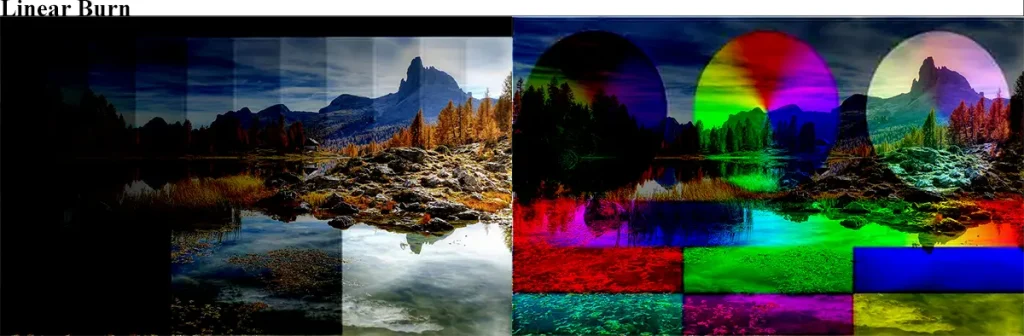
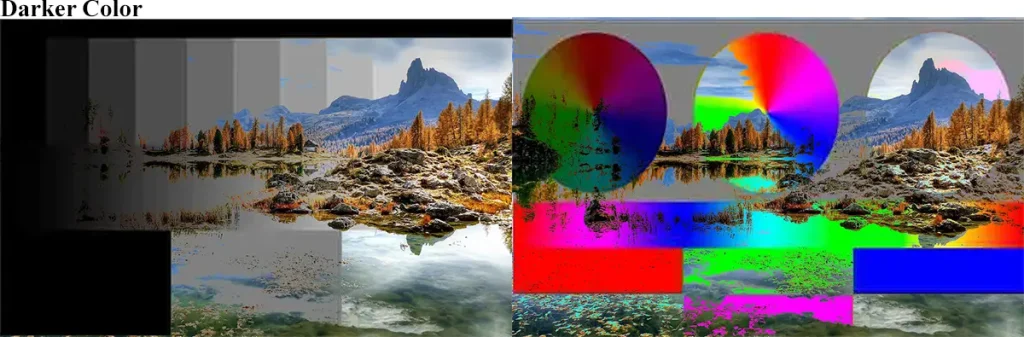
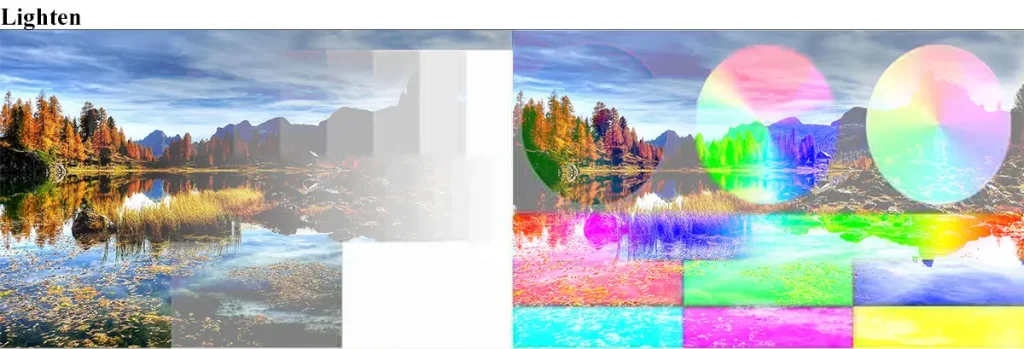
Unless otherwise specified, the visuals in each section will display the results of each Blend Mode at 100% opacity. A color layer plus a grayscale luminosity layer make up each example’s Blend stack. The Base layer will consist of the sample photo.
Normal Blend Modes
This category’s Blending Modes lack pixel-blending algorithms. Rather, the blend between layers is managed by the Opacity slider.
Normal
For Photoshop layers, “Normal” is the default Blending Mode. Without using any calculations or algorithms, opaque pixels will cover the pixels immediately beneath them. To expose or blend the pixels with the layer underneath, you must lower the Opacity.
Shortcut = Alt Shift N for Windows or Option Shift N for Mac
Dissolve
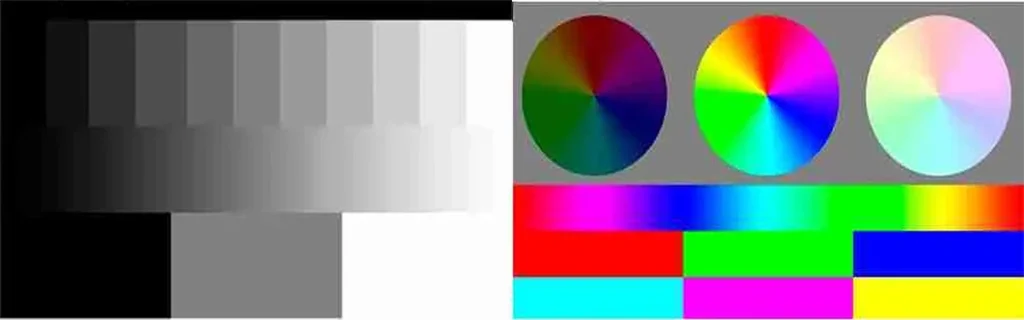
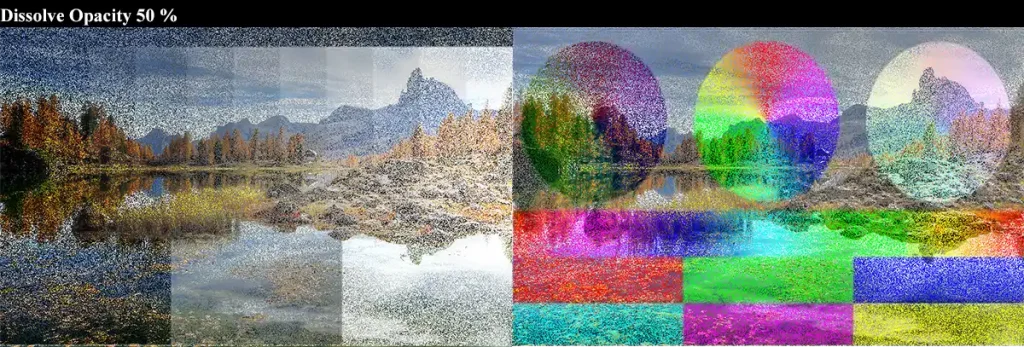
Additionally, pixels are not blended when using the Dissolve Blending Mode. When the Opacity or Fill of the layer is decreased, Dissolve only shows the pixels beneath. The pixels below are exposed via a pseudo-random noise dither pattern, with strength determined by the Opacity.
What dissolves shows is either the blend color or the base color. It never shows both at the same time. It won’t have any anti-aliasing so that it will look rough and fuzzy.
Shortcut = Alt Shift I for Windows or Option Shift I for Mac
Darken Blend Modes Category
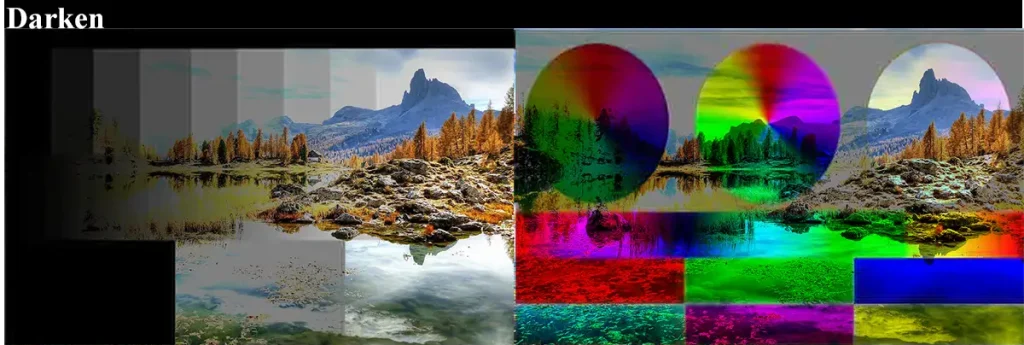
The Photoshop Blending Modes under the Darken category will make the Result colors darker, as the name suggests. All of the Blend Modes in this group use white as a Neutral Color. Pixels that are white will become see-through, and pixels that are darker than white will make the pixels below them darker.
Darken
Depending on which is darker, the Darken Blending Mode chooses either the base color or the blend color based on the brightness values in each RGB channel. Rather than blending pixels, this Blending Mode simply compares the base and blend colors and retains the darker one. If the colors of the blend and base layers match, nothing has changed.
Shortcut = Alt Shift K for Windows or Option Shift K for Mac
Multiply
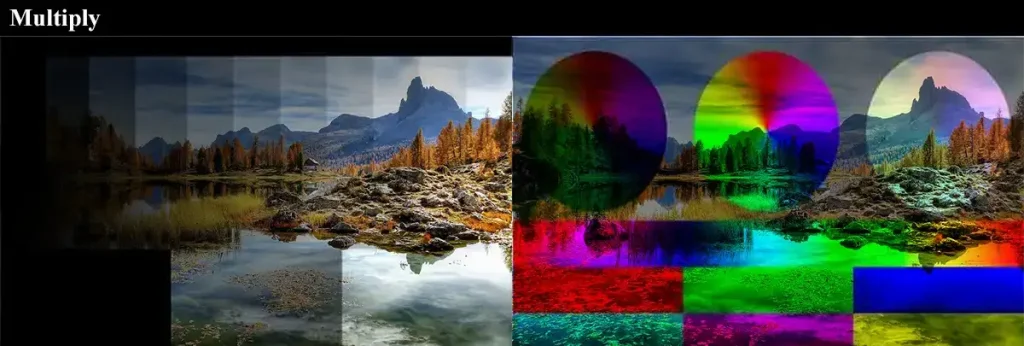
One of the most frequently used Blending Modes in Photoshop is Multiply. I do not doubt that you have utilized it on numerous occasions in the past. This Blending Mode darkens the base color by multiplying it with the blend color. The color that comes out is always darker. The black pixels stay the same, but the white pixels change.
Depending on the blend layer’s luminosity values, Multiply can produce a wide range of darkness. Multiply is a great Blending Mode for making pictures darker or adding shadows.
Shortcut = Alt Shift M for Windows or Option Shift M for Mac
Color Burn
Color Burn is one of Photoshop’s eight blending modes, which produces different results when adjusting Opacity than when changing Fill value. By enhancing the contrast between the base and blend colors, the Color Burn Blending Mode produces a darker result than Multiply, with more intensely saturated mid-tones and fewer highlights.
Shortcut = Alt Shift B for Windows or Option Shift B for Mac
Linear Burn
Depending on the blend color value, Linear Burn reduces the base color’s brightness. The outcome is less saturated than Color Burn but darker than Multiply. Additionally, compared to the other Blending Modes in the Darken category, Linear Burn creates the most contrast in darker hues.
The blend effect of Linear Burn, one of the eight blending modes, is distinct from that of Opacity when the Fill parameter is changed.
Shortcut = Alt Shift A for Windows or Option Shift A for Mac
Darkening blend modes may seem similar, but subtle differences can dramatically affect shadows and color depth. Explore our Multiply vs Linear Burn comparison to see which mode works best for your project
Darker Color
The Darker Color Blending Mode closely resembles the Darken mode. This Blending Mode does not amalgamate pixels. It solely evaluates the base and blend colors, retaining the darker of the two. The distinction is that Darker Color evaluates the amalgamation of all RGB channels, while Darken assesses each RGB channel independently to produce a final blend.
Lighten Photoshop Blend Modes Category
This category’s Blending Modes complement or contrast with those in the Darken category. The results will have brighter colors. All of the Photoshop Blend Modes in this group use black as a neutral Color. Pixels that are black will become transparent, and pixels that are lighter than black will make the pixels below them brighter.
Lighten
It keeps the lighter of the base color and the blend color when the Lighten Blend Mode is used. There is no change if both colors are the same. As with Darken, Lighten blends the pixels by looking at each of the three RGB bands on its own.
Shortcut = Alt Shift G for Windows or Option Shift G for Mac
Screen
Another of Photoshop’s most widely used Blending Modes is Screen. Brighter colors are always the end outcome. Black does not alter anything; instead, it turns transparent, leaving the brighter pixels intact.
Suppose you want to brighten photographs or create highlights. In that case, Screen is an excellent Blending Mode to use because it provides a wide range of brightness levels based on the blend layer’s luminosity values.
Shortcut = Alt Shift S for Windows or Option Shift S for Mac
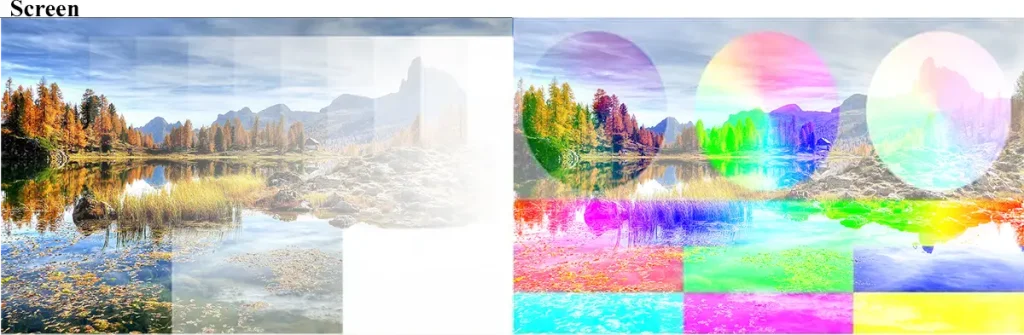
Need to know how to create glow effects in Photoshop? See Create Glow Effects with Screen Mode to learn more about this popular lightening mode.
Color Dodge
Adjusting Fill has a different effect on Color Dodge, one of the special blend modes, that produces various outputs between adjusting Opacity and Fill. By lowering the contrast between the base color and the blend color, the Color Dodge Blending Mode makes the effect brighter than Screen. This is done by making the mid-tones and highlights more saturated.
Shortcut = Alt Shift D for Windows or Option Shift D for Mac
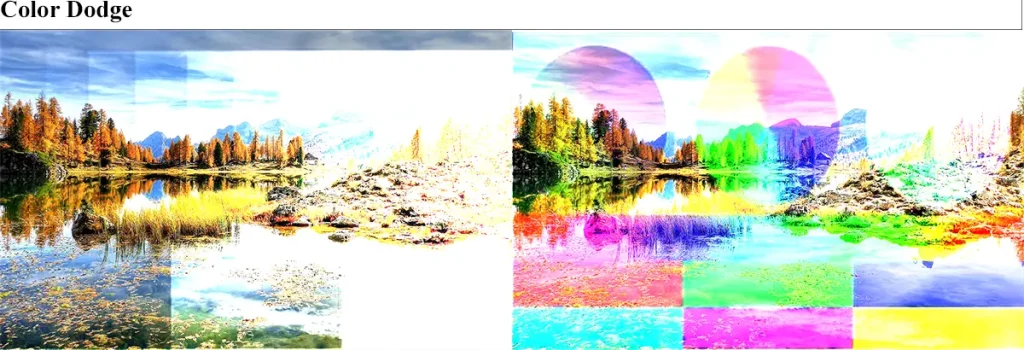
Soft glow and intense highlights may seem similar, but choosing the right blend mode can dramatically change the final image. Explore our Screen vs Color Dodge comparison to see which one fits your editing workflow
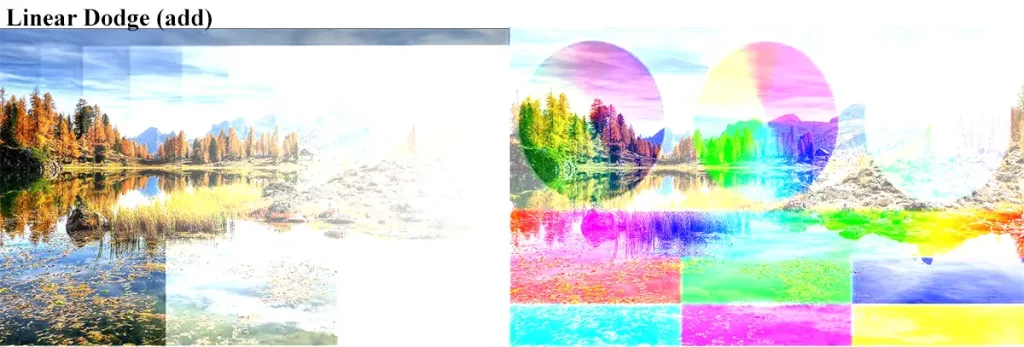
Linear Dodge (Add)
Compared to Screen or Color Dodge, Linear Dodge yields results that are comparable but more robust. By boosting brightness, this Photoshop Blending Mode brightens the base color to reflect the blend color, analyzing color information in each channel. Adding black doesn’t make a difference.
Shortcut = Alt Shift W for Windows or Option Shift W Mac
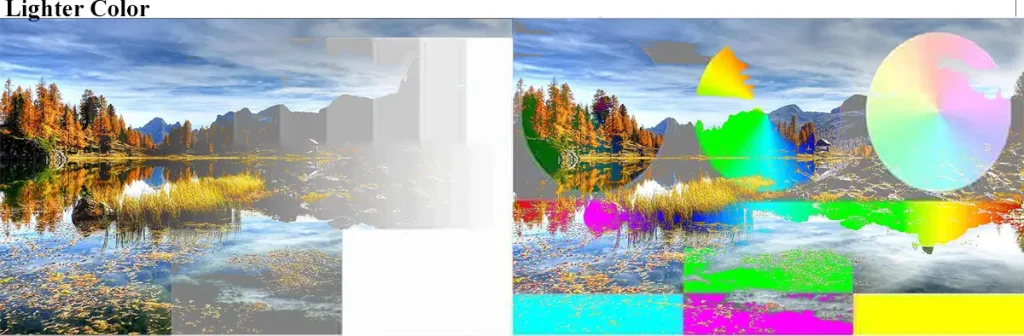
Lighter Color
Lighter Color is a lot like Lighten. This mode doesn’t blend pixels. It only considers the base color and the blend color, and keeps the brighter one. To create a final blend, Lighter Color considers the composite of all RGB channels, while Lighten considers each RGB channel separately.
Shortcut = Alt Shift for Windows or Option Shift for Mac
Contrast Photoshop Blend Mode Category
Blending Modes that fall under this category are a hybrid of those that fall under the Darken and Lighten categories collectively.
These blending modes create contrast via darkening, dark areas, and lightening, light areas.) Photoshop checks whether the colors are more or less gray than half of them. A Darkening Blend Mode is used by Photoshop when the color is darker than 50% gray. A brightening blend mode is used by Photoshop when the colors are more than 50% gray.
With the exception of Hard Mix, 50% gray serves as a Color without any changes for all Blend Modes within this category.
Overlay
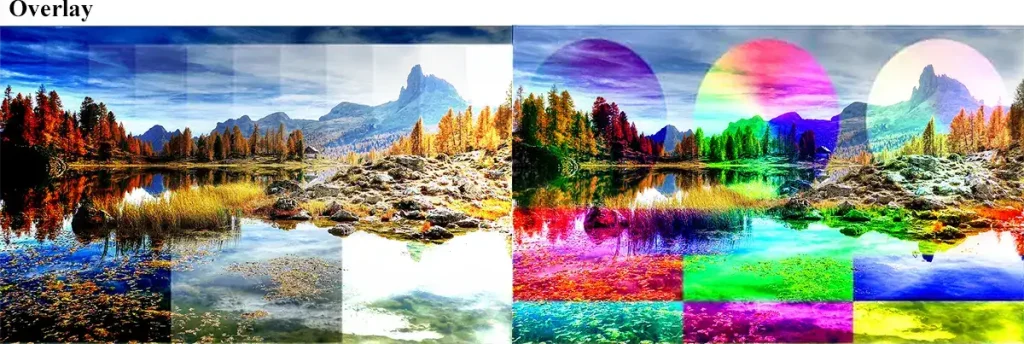
Overlay is one of the most often utilized Photoshop blend modes in Photoshop. It employs the Screen mode at fifty percent intensity for colors above fifty percent gray. Apply the Multiply effect at half power on colors darker than 50% gray. Fifty percent gray becomes translucent.
Overlay can also be seen as a game of shifting mid-tones. Colors in the mid-tones get darker when tended toward dark tones and lighter when tended toward light tones. Overlay differs from the other contrast blending modes in that it uses the base layer’s color brightness to determine how much contrast to apply. The blend layer’s brightness serves as the basis for all other contrast-blending modes’ calculations.
One thing about Overlay and Hard Light is that when you apply one of them to the blend layer, it will provide the same effect as using another matching Photoshop blend mode to the base layer in reverse order. To rephrase, the effect you obtain by applying the Overlay Blending Mode to the blend layer is identical to that of using the Hard Light Blending Mode to the Base layer, but in the opposite sequence.
Shortcut = Alt Shift O for Windows or Option Shift O for Mac
Soft Light
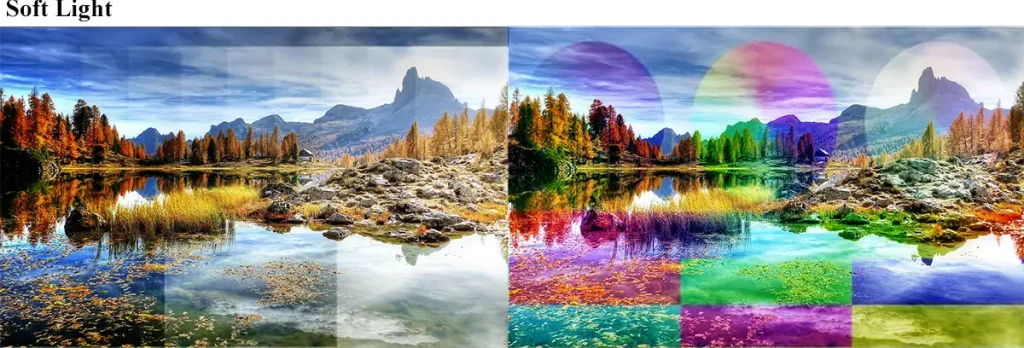
Often, Soft Light is like Overlay. Depending on the brightness values, it either makes things darker or lighter, but in a much more subtle way. Soft Light can be compared to Overlay, but without the sharp contrast.
Shortcut = Alt Shift F for Windows or Option Shift F for Mac
For portrait retouching and natural-looking contrast adjustments, Soft Light is often preferred over Overlay. Discover when to use each mode in Overlay vs Soft Light in Photoshop
Hard Light
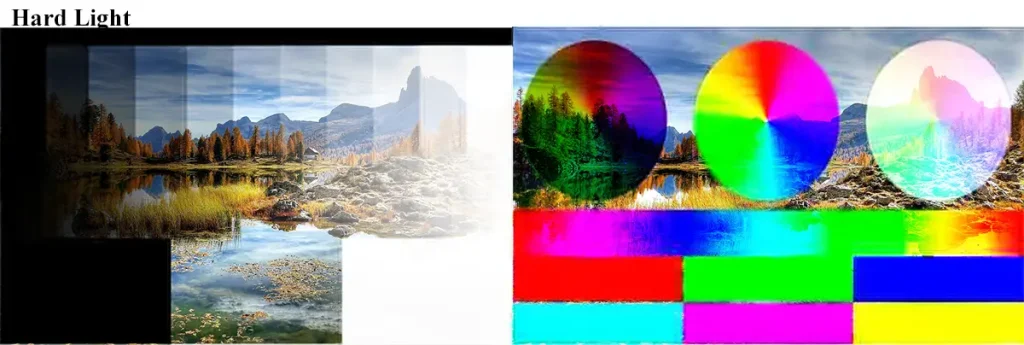
For its calculations, Hard Light uses the Blend layer’s brightness values to blend the Multiply and Screen. The base layer is utilized by the overlay. When you use Hard Light, the effects are often very strong, and you will need to lower the Opacity to get better results. Contrary to what you may expect, Hard Light has nothing in common with Soft Light. It has a lot more in common with Overlay.
Shortcut = Alt Shift H for Windows or Option Shift H for Mac
Vivid Light
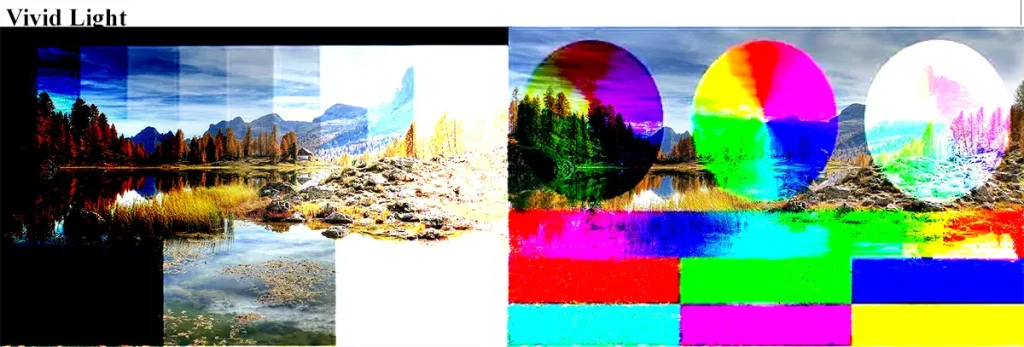
Vivid Light is like a supercharged version of Overlay and Soft Light combined. Darkening is applied to anything darker than 50% gray, and lightening is applied to everything lighter than 50% gray. Vivid Light produces a powerful effect, thus you’ll probably need to lower the Opacity or Fill.
Vivid Light is one of the Photoshop Blending Modes, exhibiting distinct blending characteristics when Fill is modified in contrast to Opacity.
Shortcut = Alt Shift V for Windows or Option Shift V for Mac
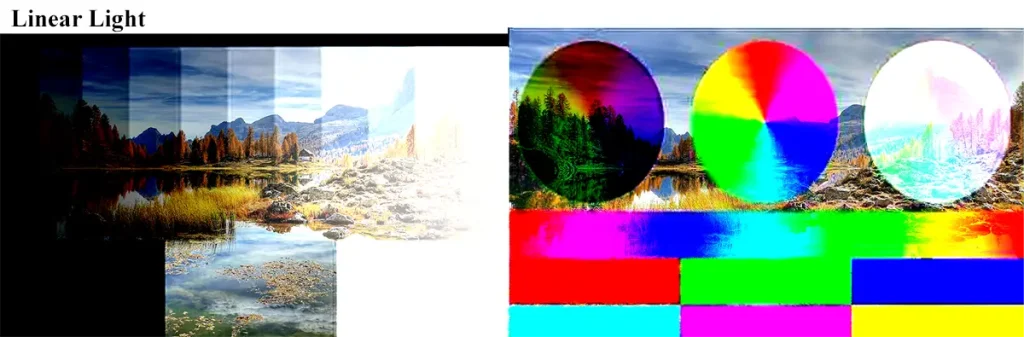
Linear Light
Linear Light employs a combination of Linear Dodge for lighter pixels and Linear Burn for darker pixels. You will probably need to lower either the Fill or the Opacity because Linear Light produces a powerful result. Linear Light is one of the Photoshop Blend Modes, exhibiting distinct blending characteristics when Fill is modified in contrast to Opacity.
Shortcut = Alt Shift J for Windows or Option Shift J for Mac
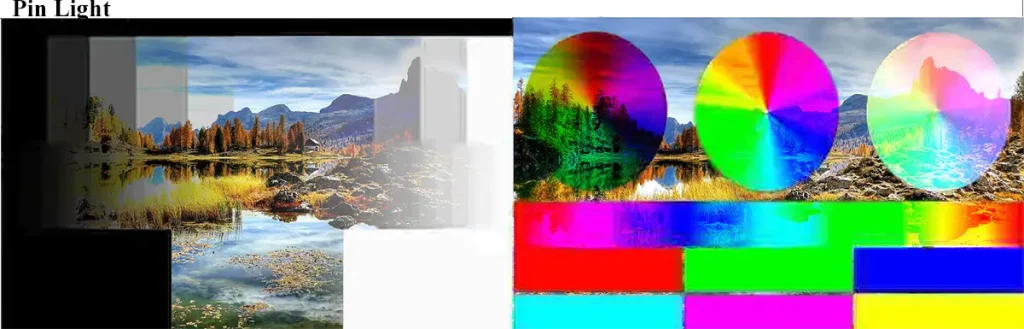
Pin Light
Pin Light is an extreme blending mode that blends light and dark at the same time. It eliminates all mid-tones and may cause patches.
Shortcut = Alt Shift Z for Windows or Option Shift Z for Mac
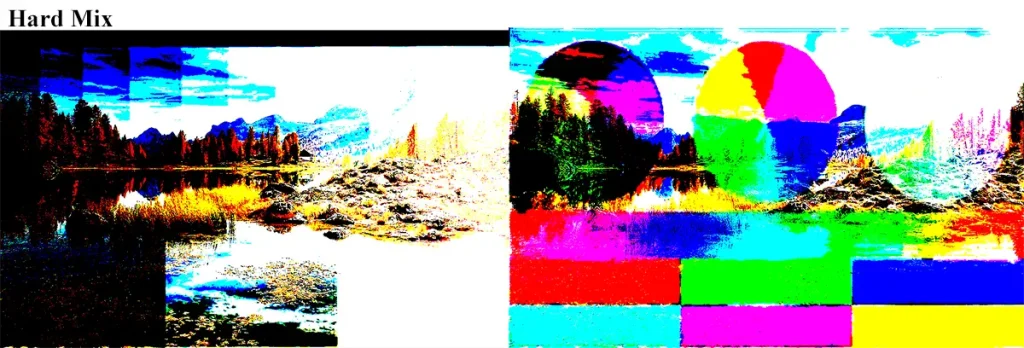
Hard Mix
For each blend layer’s RGB channels, Hard Mix adds their value to the base layer’s corresponding RGB channels, thereby applying the blend. It makes the picture less clear, and the colors can only be black, white, or one of the six basic colors (red, green, blue, cyan, magenta, or yellow).
If you want less dramatic outcomes, you’ll have to dial back the intensity. Hard Mix blends differently depending on Fill than Opacity.
Shortcut = Alt Shift L for Windows or Option Shift L for Mac
Inversion Blend Modes Category
The Inversion Blending Modes identify discrepancies between the base and blend layers to generate the blend.
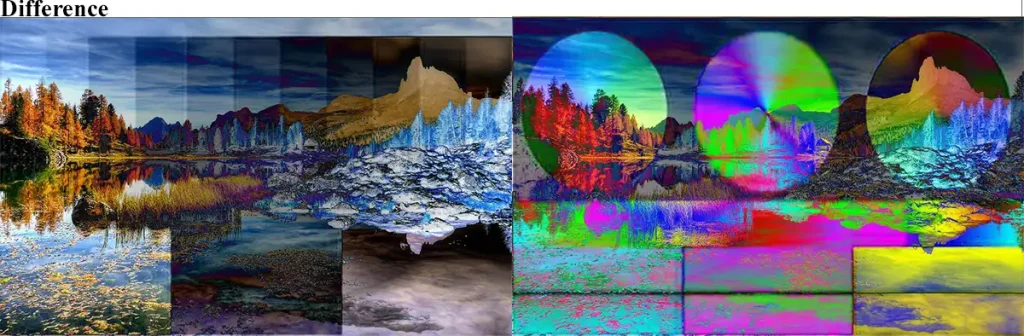
Difference
The Difference Blending Mode utilizes the disparity between the base and blend pixels to produce the resultant blend. The colors of the base layer are reversed when white is used. Inverting the colors of the base layer by pressing Ctrl I (Windows) or Command I (Mac) will produce the same result as turning the colors around.
Dark grays add a subtle darkening effect, whereas black produces no difference. When aligning layers that include content that is similar to one another, this Photoshop blend mode can be beneficial. The output will become dark if two pixels are identical.
The Difference mode is one of Blending Modes, which interacts differently when Fill is modified in contrast to Opacity.
Shortcut = Alt Shift E for Windows or Option Shift E for Mac
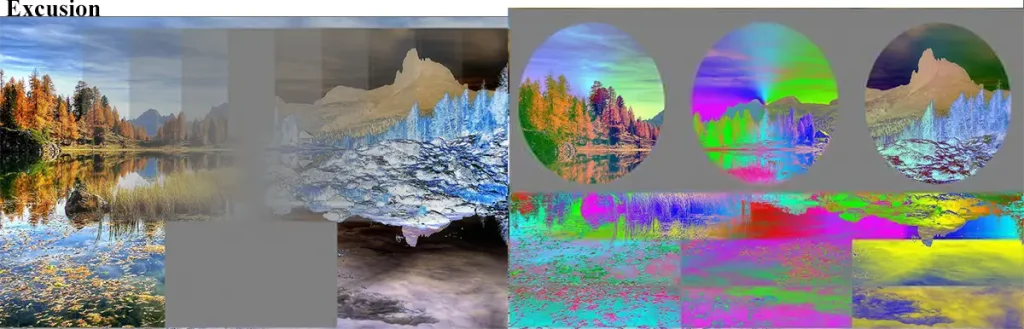
Exclusion
Difference and Exclusion are incredibly similar. The base color values invert when blended with white, but remain unchanged when mixed with black. On the other hand, 50% gray is produced when blending.
Shortcut = Alt Shift X for Windows or Option Shift X for Mac
Subtract
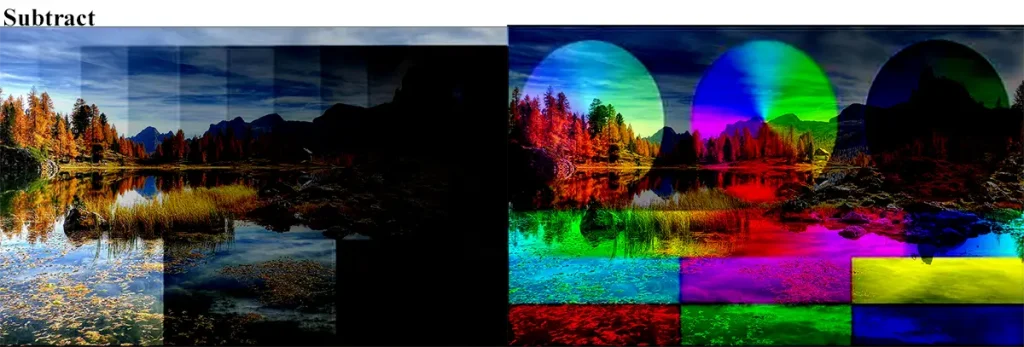
Pixel values are subtracted from the base layer using the Subtract Blend Mode. By reducing brightness, this Photoshop Blend Mode significantly darkens pixels. Black is ineffective. The outcome only becomes darker as the blend values become brighter.
Observe how the gradient’s dark regions caused very little change, while the light regions are nearly entirely black. The reverse of Divid is the result of subtraction.
Divide
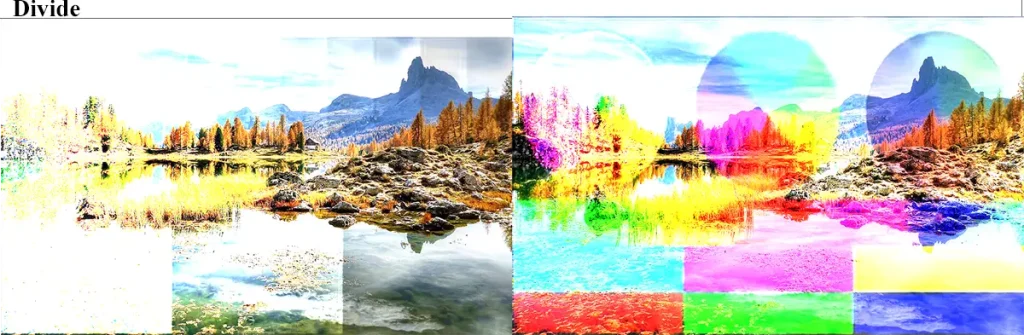
Divide converts every color to a percentage. Since any number divided by itself is 1, or 100%, blending with the same hue yields white. You get black if you dive by zero because it’s not specified. Nothing changes. The result of Divide is the opposite of that of Subtract.
White is ineffective. The effect only becomes brighter as the blend values become darker. The dark regions of the blend layer yield luminous colors, whereas the light regions result in minimal alteration. Divide produces the same outcome as inverting the Blend layer and base layer, and altering the Photoshop Blend Mode to Color Dodge.
Color Blend Modes Category
The Color Blend Modes Category utilizes combinations of the primary color components—hue, saturation, and brightness—to generate the blend. The Photoshop Blend Modes inside the Color Category are inaccessible in Grayscale Mode.
Hue
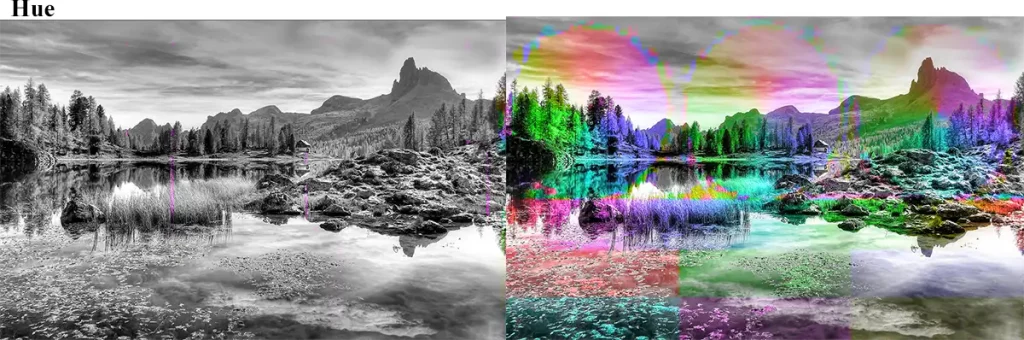
The Hue Blend Mode keeps the hue of the blend colors while keeping the brightness and saturation of the base colors. Hue will not implement a modification if the base layer is a neutral gray. Changing the hues of a layer while preserving the original’s tones and saturation can be accomplished with the Hue Blend Mode.
Shortcut = Alt Shift U for Windows or Option Shift U for Mac
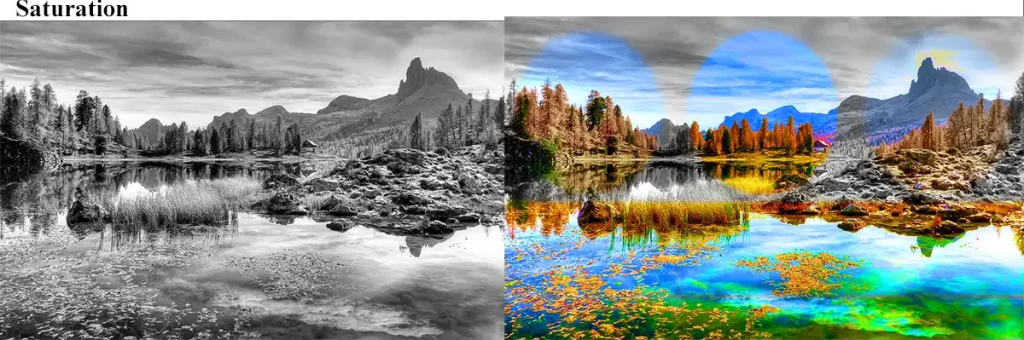
Saturation
Details: The Saturation Blending Mode adds the saturation of the blend colors to the hue and brightness of the base colors. In the case of a neutral gray base layer, saturation will not apply a modification. Because none of the pixels have color, a black-and-white blend layer will make the picture black and white.
Shortcut =Alt Shift T for Windows or Option Shift T for Mac
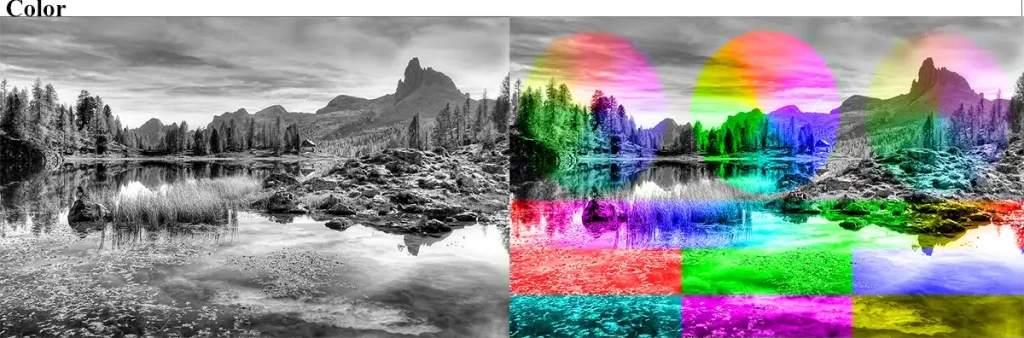
Color
The brightness of the base colors is affected by the hue and saturation of the blend colors when using the Color Blending Mode. For the purpose of colorizing monochromatic photographs, the Color Blending Mode is an excellent choice.
To achieve the same effect as applying the Luminosity Blending Mode to the base layer and then inverting the order of the layers, you can apply the Color Blending Mode to the blend layer.
Shortcut = Alt Shift C for Windows or Option Shift C for Mac
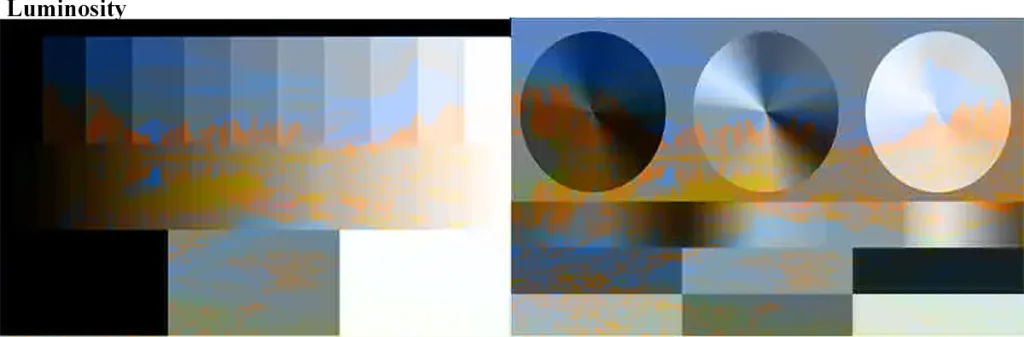
Luminosity
The Luminosity Blend Mode adds luminosity ( brightness and darkness ) of the blend layer to the base layer colors.
Shortcut = Alt Shift Y for Windows or Option Shift Y for Mac
Blend Modes for Painting Tools
Behind
Using the Behind Blend Mode, you can selectively paint on a layer’s transparent pixels. If Lock Transparency is not active on the layer, this Blend Mode will apply.
Shortcut = Alt Shift Q for Windows or Option Shift Q for Mac ( When a painting tool is in use )
Clear
As with the Eraser Tool, pixels can be erased using the Clear Blend Mode. If Lock Transparency is not active on the layer, this Blend Mode will apply. Using the same brush to erase as you paint is a fantastic way to use Clear.
Please note: You can erase using the brush you are presently using by holding down the ` key (tilde) in Photoshop 2020 and later. Setting the Photoshop Blend Mode to Clear is not necessary.
The Clear Blend Mode can be utilized with the Shape Tools (If you select the fill region), Paint Bucket Tool, Brush Tool, Pencil Tool, Fill command, and Stroke command.
Shortcut = Alt Shift R for Windows or Option Shift R for Mac ( When a painting tool is in use )
Applying the Image and Blending Mode in the Calculations
Add
The Add Blending Mode is present in both the Calculations and Apply Image commands.
Pass Through Blend Mode
You will observe that the Blend Mode is not Normal by default when you select a group. It’s Pass Through instead. The Pass Through Blending Mode instructs Photoshop to consider all layers inside a group as components of a standard layer stack. The group serves just as an organizational instrument, with all layers seamlessly integrating as anticipated.
Changing the Pass Through Blending Mode to an alternative Photoshop Blend Mode causes Photoshop to merge the layers within the group. Subsequently, it blends the resulting composite with the layers beneath using the selected Blending Mode.
This yields an identical outcome as consolidating all the group’s layers into one layer and using a Blend Mode. When compositing, Pass Through can be used to produce stunning effects. All adjustment layers within a group will only impact the group’s contents when the Blending Mode is set to Normal.
Frequently Used Blend Modes
Photoshop.
( There are different ways to work in Photoshop. But these forms of blending are likely to be the ones you use the most. I would remember how these Photoshop blend modes work. They can help you make almost any Photoshop look you want.
- Multiply
- Screen
- Overlay
- Soft Light
- Color
- Luminosity
Photoshop Blend Modes Shortcuts
By clicking on the drop-down menu and choosing an option from the list, you can modify the Blending Mode of a layer. As an alternative, you can utilize the Blend Modes keyboard shortcuts in Photoshop. To switch to the next Blending Mode, press Shift + (plus). Alternatively, you can go up the list by shifting (minus).
This shortcut will alter the tool’s Blending Mode rather than the layer if you have a painting tool open. The Blend Mode adjustment will be visible in the Options Bar. To avoid this, choose the Move tool with the V key, then use Shift + (plus) or Shift – (minus) to navigate the Blending Modes.
It’s not possible for these shortcuts to work if the blue highlight is on the Blending Mode drop-down box in the Layers Panel. To remove the attention from the drop-down, just press Enter (Windows) or Return Mac. Then, use any shortcut again.
With the exception of Darker Color, Lighter Color, Subtract, and Divide, each photoshop Blend Mode has a designated keyboard shortcut. I only advise learning shortcuts for the Blending Modes that are most frequently used, though. Press Alt Shift for Windows or Option Shift for Mac to choose a Blending Mode, then press the appropriate key.
| Blend Mode | Shortcut |
| Normal | N |
| Dissolve | I |
| Darken | K |
| Mutiply | M |
| Color Burn | B |
| Linear Burn | A |
| Darker Color | __ |
| Lighten | G |
| Screen | S |
| Color Dodge | D |
| Linear Dodge (add) | W |
| Lighter Color | __ |
| Overlay | O |
| Soft Light | F |
| Hard Light | H |
| Vivid Light | V |
| Linear Light | J |
| Pin Light | Z |
| Hard Mix | L |
| Difference | E |
| Exclusion | X |
| Subtract | __ |
| Divide | __ |
| Hue | U |
| Saturation | T |
| Color | C |
| Luminosity | Y |
Sources