Multiply vs Linear Burn: Which Blend Mode Creates Better Shadows
Photoshop

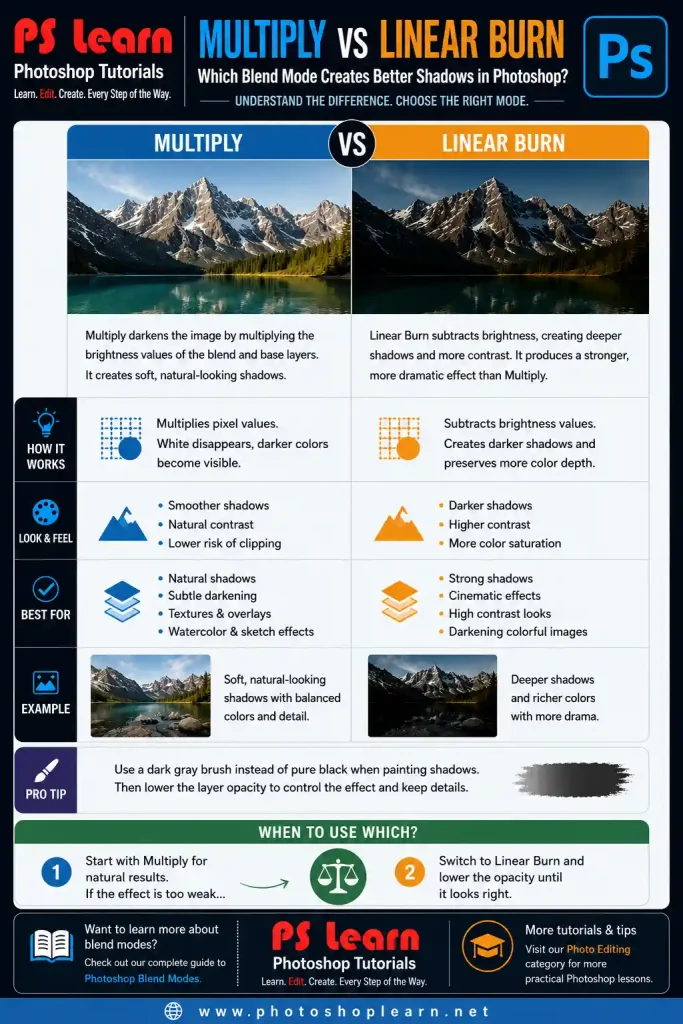
Blend modes can dramatically change the mood and contrast of an image. While Multiply and Linear Burn both darken layers, they do not produce identical results. Understanding the difference between these two blend modes helps you create more natural shadows, richer textures, and stronger contrast in your edits.
If you’re new to blend modes, start with our complete Blend Modes guide to understand how different blending options work in Photoshop.
Topics
What Does Multiply Blend Mode Do?
Multiply is one of the most widely used blend modes in Photoshop. It darkens pixels by multiplying the brightness values of the blend layer and the base layer. White areas disappear, while darker colors become more visible.
This blend mode is often used for:
- Adding realistic shadows
- Darkening textures
- Enhancing contrast
- Creating watercolor and sketch effects
The result is usually smooth and natural, making Multiply a safe choice for most projects.

What Does Linear Burn Do?
Linear Burn also darkens the image, but it produces deeper shadows and stronger color saturation. Compared to Multiply, it creates more dramatic results and preserves more color information in dark areas.
This blend mode is useful for:
- Cinematic effects
- Strong shadows
- Texture overlays
- Darkening colorful images without producing dull grays
Because Linear Burn is more aggressive, it can easily create clipped shadows if opacity is too high.
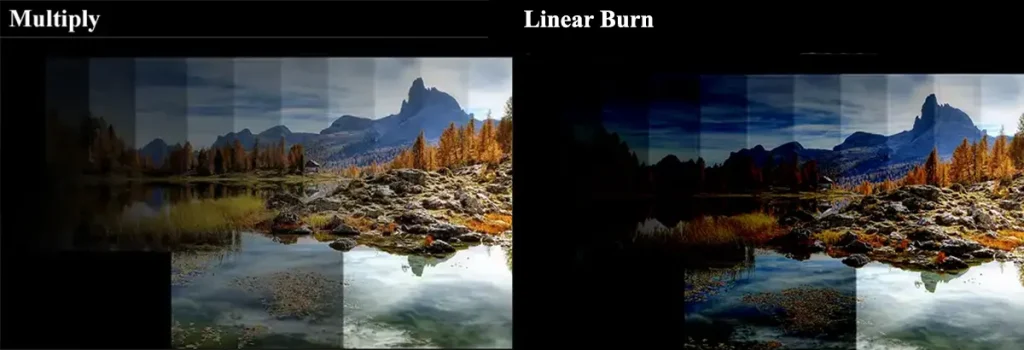
Multiply vs Linear Burn: The Main Difference
Although both modes darken images, Multiply produces softer and more realistic shadows, while Linear Burn creates higher contrast and richer colors.
Multiply works well when subtle adjustments are needed. Linear Burn is better when you want dramatic depth and stronger color intensity.
Practical Example: Adding Shadows to a Product Photo
Imagine you are editing a product photo for an online store.
Using Multiply
Create a new layer and paint soft shadows with a dark gray brush. Change the blend mode to Multiply and reduce opacity. The result looks natural and blends smoothly with the background.
Using Linear Burn
Repeat the same process using Linear Burn. Notice how shadows become darker and colors appear more saturated. This effect can work well for advertising graphics or dramatic presentations, but it may be too strong for realistic photography.
Working on creative image adjustments? Browse our Photo Editing Tutorials category for more practical Photoshop techniques.
Which Blend Mode Is Better for Texture Overlays?
For paper textures, dust effects, and watercolor overlays, Multiply usually creates cleaner results.
Linear Burn becomes useful when you want stronger contrast and more visible texture details.
Recommended Workflow
If you’re unsure which mode to use, start with Multiply first. Increase the layer opacity gradually. If the effect still feels weak, switch to Linear Burn and lower opacity until the image looks balanced.
This approach gives you more control and prevents overly dark shadows.
Looking for softer darkening effects? Compare Overlay and Soft Light to see how contrast-based blend modes behave in different projects.
Final Recommendation
Multiply and Linear Burn may seem similar, but they serve different creative purposes. Multiply is excellent for subtle and realistic darkening, while Linear Burn is better suited for bold shadows and high-contrast effects.
Learning when to use each blend mode is more important than memorizing definitions. Experimenting with both modes on real projects will help you develop a more intuitive editing workflow.
Sources